Class Picture

Class Picture

Saturday, October 17, 2015

"The Dot" Project

Have you ever wondered where you were going to get your next big idea? Or what might inspire you to do some new project?

Well, I was sitting in a Techie Tuesday in September and I found my idea. I was taking some time to read through Twitter and I saw a post about 2nd graders. Of course, it sparked my interest.  The Tweet was about the book, The Dot by Peter H. Reynolds and it was accompanied by a cute video.


Thanks to +Darin Swenson, an educator from Minnesota, who I met at EdCamp Omaha a couple of years ago thanks to my friend +Brent Catlett I now had a great idea! 
I began the project of course by reading the book, The Dot.  My students were very excited to make their very own "dot" artwork just like Vashti in the book. We started by tracing 1 large dot, then 2 smaller dots, next 3 even smaller dots and finally 4 more small dots. Students were able to choose the placement and color of all their dots. The artwork looked great, but it was missing something. That's when I decided to marble paint over the top of the art pieces. This was the final step needed to make the art look even more spectacular.
 

 For the next part of the project I showed my class a video from Kid President. Kid president always wants to inspire kids to think deep and to DO something! My students then brainstormed ways that they could be AWESOME! There were some really good responses and some silly ones too. They wrote up their responses and were ready to make a video.

I really liked how the video posted by +Darin Swenson had the artwork behind each student. I knew that is what I wanted to do but knew that would require use of a green screen, which I didn't have. So, being the crafty person I am I "Googled" images of green screens and read about how to make one. This lead me to my decision to just use fabric. I made my $10 purchase of 5 yards of bright green fabric. I used cardboard rolls taped together, a staple gun to attach the fabric and now I have two green green screens to use in my classroom.  Each is about 45" wide and 2/1-2 yards long. They can hang from the ceiling by hooks and string when I want to use them and then they roll up for easy storage. 
     

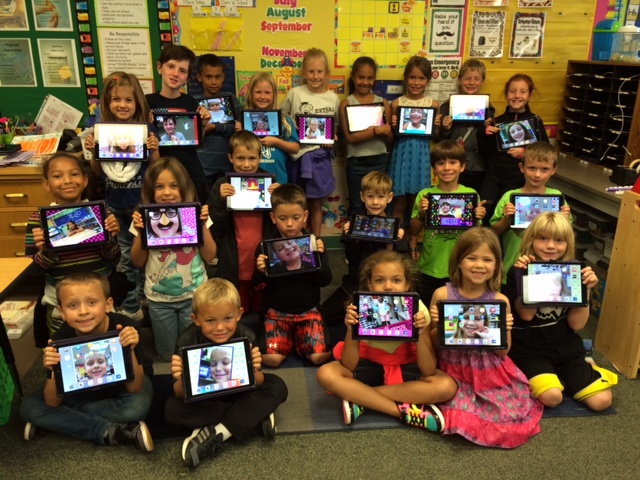
I had my students stand in front of the green screen and I used my iPad to record their video. Then I used the app Green Screen by Do Ink to layer the artwork and the video together. I then dumped all the videos into iMovie to make the final production. I added some credits to the beginning to make the video complete. 


And just think. . . if I had not been sitting in the Techie Tuesday reading through Twitter. . . I would have possibly missed seeing this idea and never completed this fun project. 

Now, I am looking forward to using the green screen for even more projects in my classroom!


Thursday, April 30, 2015

Graphing Fun


Graphing is fun! That's what I wanted my students to say after we completed our graphing project. And I think it was a success!

So it was graphing time in 2nd grade and I wanted to try and use our iPads for this topic. I started by having my students come up with three different questions with up to five choices. They had great questions from favorite type of hen, favorite Minecraft character, favorite school lunch, favorite board game to many others.

The next step involved our wonderful 6th Grade buddies. They came in and helped my students type up their questions using Google Forms in Safari. I am very thankful for the extra hands too. Google Forms tended to be very sensitive on the iPad.


After creating their form, my students shared it with me via Google Drive. I then did some networking and sent out their forms to other classrooms in my school district. I chose other teachers with 1:1 iPad classes. That way my students could get several responses from other kids. My teacher friends didn't let me down. Some of my students received over 60 responses to their questions.

Now came the daunting task of counting the responses and organizing the data. My students were able to view their data in Google Drive. That is a nice feature of using Google! It all works together!! My students recorded their data using tally marks and a table. It was an unplugged way to record the data, but it got the job done.


The final step was to turn the data into graphs. My students made bar graphs and a pictographs. They used pre-made tables to organize their data. This was not a high-tech way to make a graph, but I wanted my students to make a paper graph before using technology to make a graph. My goal was for them to understand the complete process of how to make a graph from beginning to end.

 
Now that my students completed their graphs on paper, I really wanted them to use technology to make a graph. Problem was finding an App that was easy for young students to use. I went to the App store and started looking. There are some free Apps, but they didn't look kid friendly or the reviews were a little negative. I found a $2.99 App called "Graphing For Kids." The App walks students through a "How To" and then "Chart Maker" sections. Students have to title their graph, label the graph, input the choices and the numbers. Then they click on the word "graphing" and there are four options for graphs. They can make a pie chart, horizontal and vertical bar graphs, and a line graph. Students can save their data to view any time. There is not a way to export the graphs but we just took screen shots and uploaded the pictures to Google Drive to share as needed. Here are some samples of student work.


Overall the graphing project was a success! My students learned how to question, collect data, organize their data, make a graph and use a new App. I might even say that they had some fun too!

Wednesday, April 8, 2015

Trying Out Some New Apps

It is always fun to introduce a new App to my students. My students are not afraid to make mistakes and try something new. We recently learned how to use the Apps ChatterPix and Toontastic. Here's what we did...


ChatterPix is extremely easy for my 2nd graders to use. They became pros in just a few tries. ChatterPix lets kids make anything talk. We made stuffed animals, cars, books and balls talk for practice. Students load a picture, draw a line for a mouth, then record their voice and add sticker decorations. You can then save the 30 second video to the camera roll of an iPad. It's just that easy.

We then used ChatterPix for a project in Social Studies. My students were learning about different landforms on Earth. They used a drawing App on their iPad and drew each landform. Then, they used the pictures in ChatterPix. They made each landform talk. They had to explain and describe each landform. The last step was to add each landform ChatterPix video into iMovie. Students were then able to share all their Landform iMovie with parents at conferences. The parents loved hearing their child and seeing the creativity used for the project. Some students even used funny voices for each of their landforms making their work even more interesting and funny!

Here are a few examples of student work.

Jordan M.'s Landform Video

Darin C.'s Landform Video

Annah B.'s Landform Video

Toontastic has proven to be a little more difficult for my students to use. They love the all animation choices, backgrounds and the characters. The part that is hard for them is to record and animate at the same time. I have found that it easier to pair students up and one person will speak while the other does the animation and moving of characters. They take turns helping each other, which helps the finished project be better quality. 

After teaching the basics of Toontastic, I let students practice. The first project my students did in Toontastic was to define and use their reading vocabulary words in a sentence. This helped my students learn their words and have a funny way to practice each word.  

I plan to have my students work with Toontastic again soon. I would like to see them write and animate their own creative story. I'll post examples after they have completed their project.


Thursday, February 19, 2015

I'm Back Again

It has been way too long since my last blog post. No excuses... I just haven't taken the time to write about what we have been doing in class with our iPads. So now I'll try to catch up and show some of our accomplishments this year.

I was very excited to start the year with iPads this year in August. Last year, I got them in January and only had 1/2 a school year to use them with my students. Now that it is February, I have been using iPads in my classroom for a year. Wow! I have made so many changes to my teaching, instruction and assignments! Changes usually are not too easy for teachers but I have truly enjoyed the changes iPads have brought to my classroom.

So... what are some of the changes I have made in my classroom? The most noticeable change has been being almost completely paperless! ALMOST...  I have made many of my students' assignments into PDFs and then I use iTunesU and Google Classroom for student workflow. My students also use Google Drive for sharing and storing their work. I am amazed how easily my students have picked up on using these Apps and features on their iPad and they are only 7 and 8 year olds!

Now you might ask... what kind of assignments do my students do on their iPads? One of the latest assignments we completed went along with our geometry unit in math. We did some App smashing and made a movie explaining geometric concepts.  We used Explain Everything, Google Images, Geoboard and PicCollage to complete this project. Students explained 3-D shapes,  a line of symmetry, congruent shapes, translation, reflection and rotation.  Here are a couple of student examples:


Monday, May 5, 2014

Language Arts Extravaganza +Technolgy

Ever since my classroom went to 1:1 with iPads in January, I have been looking for ways to excite my students about learning. I want/wanted for my students to see how learning can connect them to the world around them. That learning takes place everywhere and at any time.  

My iPad coach, +Brent Catlett, has encouraged me to stay connected to the world through +Twitter and Google+ communities. I periodically would search through communities that I had joined. I would see ways other classrooms connected with classrooms across the US and in other countries too. So, I found a classroom looking to connect and do a project and I finally jumped on board and responded. I got "connected" to another classroom in Grimes, Iowa, and we got started on a reading, writing and art project. 


The project was to read the book, Boy + BOT, by Ame Dyckman. The book is about a boy, his robot and their adventure. Cute read! Then students in each class designed their own robot. The other teacher, +Mindy Schoop and I, electronically sent pictures of the robots to each other. Next, we assigned partners and students got busy writing an adventure story for their new robot picture. 


Since we are 1:1, it made it a lot easier for each student to have a color copy of their new robot. I sent them their picture and they were able to look at it while creating their adventure story. 
         We spent the next few days writing and editing stories.  


The final part of the plan was to read the stories via a Google Hangout. We arranged the first hangout to meet each other and check out the computer logistics. It worked well, so the plan went forward.  


It took two additional hangouts for each student to 
read their robot adventure story. 

Overall, this was a great experience! It was cool to meet other 2nd graders. Students got to read, write and draw. They also worked on their speaking and listening skills. It was a Language Arts extravaganza with a technology twist!

I am not sure I would have even thought of or known how to do this activity unless +Brent Catlett had not become an integral part of my teaching and my classroom. This only happened due to the iPad Academy. Being part of the iPad Academy has shown me many new ways to improve the way I teach. It just shows how something new can inspire a teacher, which then passes on the excitement and enthusiasm to the students. My students want to do more connecting. I know this activity will be an experience they will remember from their year in second grade.  I know I will start connecting with other classrooms in August next year and not wait until April! 


Wednesday, April 30, 2014

iShare iPad Parent Day

     The date was set and the invitation was made. It was finally time for my iPad parent meeting. My students and I were both extremely excited to share all of our iPad work and learning with our parents. I can't remember a day when I was so nervous and excited at the same time. Parents come to class parties, field trips and to conferences. They don't usually come and spend and hour in class watching their child during school. And on this day, they would be watching their child show his/her learning in a new way -- with an iPad.

     Our event got started right after lunch. Everyday after lunch my students complete something we call our "Afternoon Think Sheet." So today was no different. Students opened up their iPad and pulled up the Afternoon Think Sheet in Notability. The think sheet is a combination of word work, math and science. Before the iPads in class, students did the same activity in a notebook with paper and pencil. It takes about 5 minutes and is a great review of everyday skills.

     Next, students and parents had a little fun with the iPad. They went into Photo Booth and took some pictures together. Students were able to show their parents how they could blur images, add crazy effects and distort parts of the pictures. They had to save at least one picture for an activity at the end of our iShare Day. 

     After the pictures, we started an interactive math activity. My students just finished up units on fractions and geometry. For a fun review, I created some questions and pictures in an App called Geoboard. I then created a QR code for each picture, printed them out and posted them throughout the classroom and in the hallway. Students used a QR code reader App called I-nigma to access the picture link to each picture. Students opened the link, answered the question and recorded their answer on an answer sheet. Then they had to use one of my favorite Apps StickAround to solve a puzzle with the answers on the answer sheet.  When students use more than one App to complete an assignment we call that App Smashing. Parents really enjoyed watching their child flip in and out of the different Apps to solve the answers to the questions. They were impressed by the ease and expertise their child displayed using the iPad to demonstrate their math knowledge. Plus it was fun too!    

Pic Collage of Math Question pictures made in Geoboard App
Screen Shot of the StickAround Math QR Code Puzzle
     The next activity was to complete a project in Pic Collage. Students had to create a collage of pictures for our current science topic, Natural Resources. They had to find images/pictures of ways that people use the natural resource of plants and trees. This App allows students to use real-life pictures in their project. I saw several students pass the iPad to their parents and teach their parents how to use this App. I really enjoyed watching the parents work with their child. 


     As students finished up, I encouraged them to go into KidBlog and co-author a post with their parents. I told them to upload their crazy photo from Photo Booth too.  This was also a way to show their parents that they can follow, read and make comments to their child's blog from home. 

     The very last part of the iShare iPad Day was a question and answer time for parents. My students went to the Media Center and my amazing iPad Coach +Brent Catlett and I were able to talk with parents.  Many great comments were made and lots of question were asked. I feel that all parents left excited about the opportunity their child has had this year with using iPads in class this year.

     Overall, it was huge success.  Parents got to work with their child and see many different ways we use the iPad as a tool for our learning.  I couldn't have asked for a better turn-out or response from the parents. These are the other pictures that I took of our exciting day together.